Are you a passionate beer lover who wants to learn how to brew beer from scratch? Mastering the fundamental skills of beer making is an art and science itself, allowing you to unleash your creativity and learn to craft unique flavours that align with your taste. In this article, we are going to explore the four basic steps of beer-making at home and equip you with the knowledge required for this process.
As you venture into the journey of homebrewing, you are going to understand the essential distinctions between craft beer vs regular beer and master the basic steps of creating your unique beer flavour through the acquisition of key brewing skills.
Prepare your Brewing Equipment

Before you dive into the process of beer crafting, you need to make sure you have the right brewing equipment. Investing in each of the brewing pieces separately can be time-consuming and expensive, as you need to acquire all the necessary components to start your brewing journey. The simplest way is to buy an all-inclusive home beer brewing kit that contains all the important beer-making components that will help you make your beer from scratch.
With these homebrewing kits, you can brew a wide variety of beer flavours. All you need is to select the right ingredients included in the kit that align with your preferred style and start the brewing process. Beer brewing kits contain each of the crucial pieces essential for a successful brewing experience. These include the right selection of ingredients, a spoon fermenter, thermometer, brewing pot, brew enhancer, as well as a spray bottle for sanitising the equipment before starting the process of brewing.
In addition to these elements, you can find a detailed instruction list that will guide you through the process of beer-making through simple steps. By following these instructions you can learn how to use the ingredients and properly sanitise the equipment, as well as get acquainted with the various stages of brewing. Each piece of the brewing kit serves a specific purpose.
For instance, the sanitiser is needed for keeping everything clean and preventing any bacteria from contaminating your brew. The thermometer and hydrometer are used to monitor and measure the temperature and determine the final gravity during the brewing process. The beer enhancements are specifically formulated to improve the quality of the beer throughout the process of fermentation. These may include ingredients such as specialty grains like crystal malts or roasted malts, hop extracts, maltodextrin, or yeast nutrients that can add complexity, and colour, and enhance the overall flavour of your homemade beer.
In addition to all of these pieces, you will need a quality set of ingredients and a large brew kettle to start boiling your ingredients. A home beer brewing kit makes an ideal choice for beginner brewers who are just starting to explore the world of home brewing. However, once you progress and master the basics you can invest in more complex brewing kits that allow you to experiment with diverse flavours and ingredients and create your desired beer recipes.
Start the Process of Brewing
Now that you have all the right equipment at hand, we can move to the exciting part – the brewing process. The first step of the homebrewing procedure is called mashing. In this stage, you heat water to a specific temperature and add all the ingredients to your chosen recipe. These may include malt extract, hops, beer yeast, and additional flavouring of your choice you plan to include in your unique recipe.
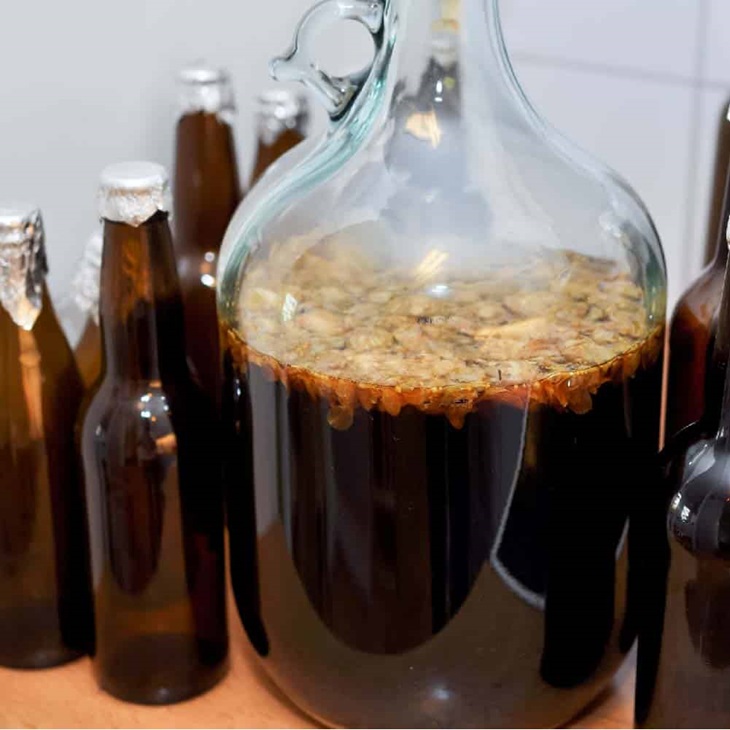
The mashing lasts typically from 60 to 90 minutes until the activated enzymes convert into fermentable sugars. Once it’s completed, you can start with the separation process. During this process, a liquid known as wort is separated from the spent grains which is done using a mash tun or a specific lautering vessel.
When the process of separation is concluded, the hops are added to the wort to begin the process of boiling. The boiling stage lasts around 60-90 minutes depending on the beer recipe. During this process, the hops are added at different intervals to impart a specific bitterness and flavour to the beer. Longer boiling time often produces increased caramelisation which results in a richer and darker taste of the beer. After the boiling, you need to cool down the boiled wort to a temperature suitable for the fermentation process to successfully begin.
Ferment your Brew
Once the wort is cooled, you need to transfer it to a fermentation vessel and add the yeast to initiate the process of fermentation. The yeast plays a pivotal role in converting the sugars into alcohol and carbon dioxide while influencing the overall beer flavour and aroma. During this process, a hydrometer is used to measure the amount of dissolved brewing sugar content in the recipe.
Usually, the fermenter vessel is sealed with an airlock which allows the carbon dioxide to escape and prevent contaminants from entering the brew. Some brewers opt for a second fermentation phase for their recipes which involves transferring the beer to a secondary fermenter to enhance the clarity of the beer and achieve further maturation. The fermentation process usually takes 1-2 weeks depending on the recipe.
Fill the Bottles
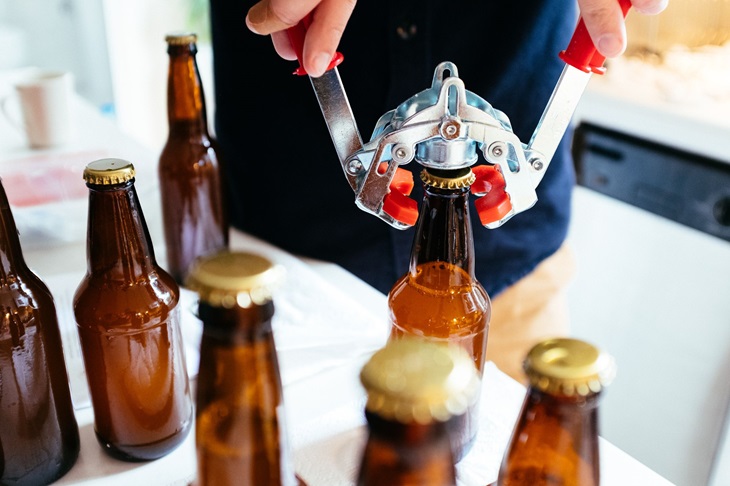
The final stage of the homebrewing journey involves the process of bottling. Before you begin with this process, you need to make sure all your equipment, including bottling caps, bottles, and siphoning tools are properly sanitised to avoid contaminating your brew. After you make sure everything is clean, you need to carefully transfer your brew into a clean bottling bucket using a siphoning tool which will help leave any sediments behind. This process is called racking.
After this, by using a bottling wand that allows you to control the flow, you can start filling up the sanitised bottles and use suitable caps to make sure they are properly sealed. Once you are done with the process of bottling, you can store your brew in a cold and dark place to let it mature and reach the desired flavour and aroma before it’s ready for consumption.